
A messy home before a shoot turns off potential buyers, leaving sellers in Houston, Austin, and San Antonio with cold leads and frustrated agents. Learning how to get the house ready for listing photos is the difference between a home that sits and a home that sells. Use this pre-shoot checklist for a productive real estate photography session.

How to Get a House Ready for Listing Photos: Ultimate Property Photography Preparation Checklist
A comprehensive listing photo checklist starts with decluttering, deep cleaning, and maximizing light, followed by staging each room to depersonalize and repair any visible flaws. Adding fresh flowers, arranging furniture, and manicuring the lawn result in professional real estate photos that attract the right buyers and help you achieve your desired closing rates.
Our professional photographers at TK Images know how to capture that important first impression. It’s the kind that stops potential buyers mid-scroll and makes them want to see your property in person. Serving Austin, San Antonio, and Houston, we’re ready to bring your real estate photos to life.
| Area | What to Do | Done? [Y/N] | |
| INSIDE THE HOME | |||
| Kitchen cabinets and counters | Clear surfaces, hide appliances, wipe until they reflect light cleanly. | ||
| Bathrooms | Scrub all fixtures, fold neutral towels, and clear personal products from counters. | ||
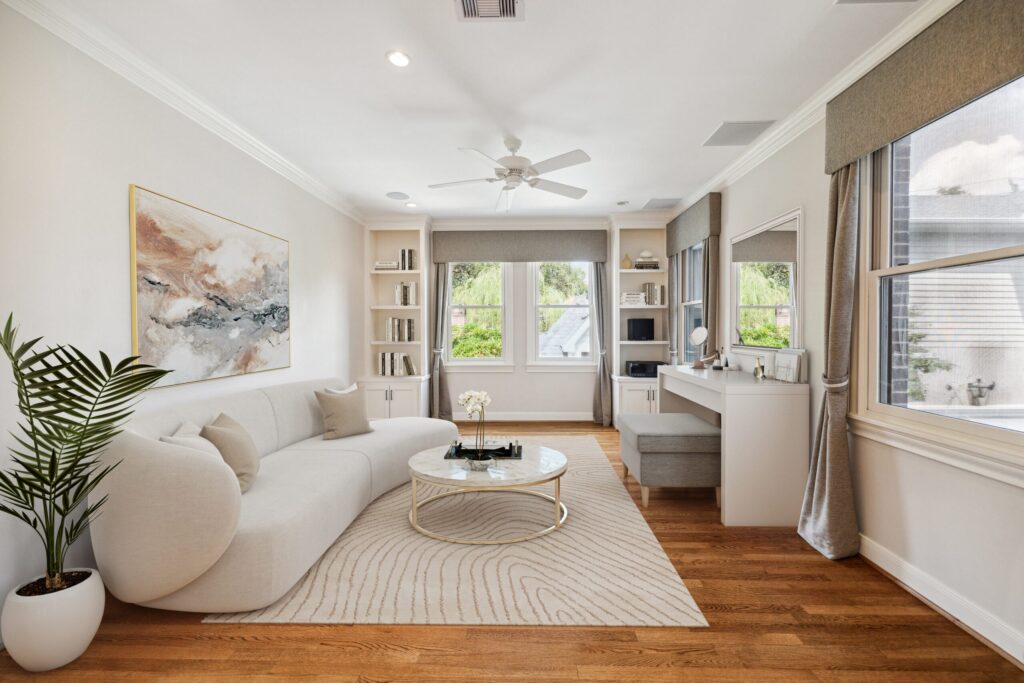
| Bedrooms | Make beds, remove nightstand clutter, and position curtains to welcome natural light. | ||
| Living room | Open the blinds fully, fluff the pillows symmetrically, and angle the furniture away from the walls. | ||
| Personal items | Box up personal photos, memorabilia, trophies, and religious items. | ||
| Surfaces | Add flowers in colors that complement the room and draw attention to focal areas. | ||
| Electronics | Turn off all computer screens, televisions, tablets, and ceiling fans. | ||
| Lighting | Replace all burned-out interior lights; match color temperature across each room. | ||
| Window | Pull back all curtains and blinds fully so natural light floods every corner. | ||
| Closets and entryways | Arrange shoes neatly, space out hanging items, and clear entryway floors of bags and clutter. | ||
| Appliance | Remove all magnets and to-do lists from the fridge, and wipe down the front panels. | ||
| Floors | Roll up floor mats and runners; remove beds, bowls, and toys from all rooms. | ||
| OUTSIDE THE HOME | |||
| Lawn and landscape | Mow, trim hedges, edge walkways, and add fresh mulch to garden beds. | ||
| Entrance | Clear cobwebs, power-wash the porch and steps, and scrub the front door and trim. | ||
| Driveway and street | Remove cars from the driveway; ask neighbors to clear street-parked cars. | ||
| Utility and equipment | Hide garbage cans and coil hoses; store all lawn equipment out of frame. | ||
| Outdoor living spaces | Wipe outdoor furniture, open patio umbrella, and add a tray or cushions. | ||
| Yard | Pull yard signs, stow children’s toys, clean windows and doors. | ||
| Lighting | Replace burned-out bulbs in fixtures; schedule a shoot when natural light hits the front directly. | ||
| Pool and Water Features | Skim the pool, brush the walls, balance the chemicals, and clean the fountains. | ||
Interior Preparation Checklist for a Real Estate Photo Shoot
Great real estate photography begins long before the camera clicks. It starts with a home that’s been thoughtfully prepared to tell its best story. When your professional listing photos shine, they draw in potential buyers who feel an immediate connection to the space, giving your property a meaningful edge in a crowded market.
1. Clear Kitchen Counters and Sinks
A cluttered kitchen counter can make even a generous kitchen feel cramped and uninviting in photos. Clearing the surfaces solves the visual noise problem, letting the true size and appeal of the space speak for itself.
- Store drying racks away completely to keep counters clean and photo-ready.
- Pack up appliances like coffee makers and toasters to create an expansive feel.
- Wipe down the counter surfaces until they reflect light cleanly and evenly.
2. Clean and Sanitize Bathroom Fixtures
A spotless bathroom signals care and pride of ownership, two things that reassure buyers about the condition of the entire house. Grimy fixtures and clutter are among the most common issues that make property photos fall flat, and a thorough clean solves this instantly.
- Remove used towels and replace them with freshly folded, neutral-toned ones.
- Clear the bathroom counter of personal products and store them out of sight.
- Scrub sinks, toilets, and tubs until every fixture gleams under the camera light.
3. Style the Bedrooms and Linens
Bedrooms carry emotional weight. They are where buyers picture themselves winding down, and professional photography can either capture that warmth or expose its absence. Styling this space well also solves the challenge of rooms appearing flat or uninviting when clutter is removed.
- Keep beds made and linens tidy.
- Position curtains or blinds to welcome natural light and brighten the entire room.
- Remove clutter from nightstands, dressers, and floors before the shoot begins.
4. Arrange the Living Room Furniture and Decor
The living room is where buyers imagine gathering, relaxing, and making memories. How the furniture sits in that space directly shapes that feeling. A strategic arrangement solves the challenge of rooms appearing either too sparse or too crowded in listing photos, helping the home feel balanced and welcoming.
- Open blinds and pull back curtains fully to flood the space with natural light.
- Fluff and position decorative pillows symmetrically to add warmth without visual chaos.
- Angle furniture slightly away from the walls to create depth and dimension in the frame.
5. Hide All Personal Items and Photos
When a buyer walks through a home, even virtually, they need room to picture their own lives unfolding there, and personal items can quietly block that connection. Learning to declutter and depersonalize rooms to create a spacious feel is one of the most impactful things a seller can do before the camera arrives.
- Box up memorabilia, trophies, and religious items and store them in a closet or off-site.
- Clear entryway hooks, shelves, and surfaces of bags, keys, and everyday personal belongings.
- Check every room for paperwork, mail, and visible labels that ground the space in someone else’s life.
6. Display Fresh Flowers on Surfaces
Flowers bring life to a room that staging alone sometimes cannot. They add a pop of natural color that helps emphasize key spaces in your property. This makes listing photos feel inviting rather than sterile.
- Place a small bouquet on the counter or dining table to emphasize focal areas.
- Choose flowers in colors that complement the room and add a pop of natural color to listing pictures.
- Swap wilting blooms before the shoot so every surface in the property looks fresh and camera-ready.
7. Deactivate Electronic or Computer Screens and Ceiling Fans
Screens and spinning fans are among the most distracting elements in interior photos. A paused screen can show a glare or an awkward image, while moving fan blades appear blurred, pulling focus away from the room itself.
- Turn off computer screens, televisions, and tablets before the photographer arrives.
- Switch off ceiling fans completely so fan blades appear still and clean in interior photographs.
- Double-check every room for any distracting standby lights or screensavers left running on devices.

8. Replace Burned-Out Light Bulbs
Uneven or missing interior lights create dark patches that make a property feel neglected in listing photos. Taking time to check every fixture before the shoot means the lighting bulbs work together to present a bright, welcoming space.
- Walk through each room and replace any burned-out lighting bulbs in lamps, fixtures, and recessed cans.
- Match color temperature across all interior lights in a room so the space looks consistent and warm.
- Test every switch the day before, so no surprises slow down the shoot on the property.
9. Open All Window Treatments
Closed curtains and blinds block the light that gives listing images their warmth and depth. Good lighting starts with letting the outside in. Open window treatments instantly make rooms feel larger and more welcoming.
- Pull back curtains and blinds fully so natural light floods into every corner of the room.
- Tie back any draping fabric neatly so it frames the window without blocking good lighting in listing photos.
- Remove sheer panels that dull the light if they make the room feel dim, even when the blinds are open.
10. Organize Closets and Entryways
A buyer may peek inside closets, and photographers sometimes capture them too. Piled shoes and jumbled jackets can make even a generous closet look cramped. That can make a significant difference in how a space reads in listing photos.
- Arrange shoes neatly on the closet floor, or store them in bins out of the camera’s frame.
- Hang jackets and coats evenly spaced so the closet rod looks orderly and the space looks larger.
- Clear entryway floors of shoes, bags, and clutter so listing photos convey a clean, welcoming first impression.
11. Strip Appliances of Magnets and Clutter
Refrigerator doors covered in souvenirs, to-do lists, and photographs make the kitchen feel personal. This works against a buyer trying to picture their own life there. Clearing that clutter lets the space feel clean and more expansive in interior photos.
- Remove magnets, souvenirs, and to-do lists from the refrigerator and any other appliance surfaces.
- Wipe down the front panels after clearing them so the space looks polished and ready for interior photos.
- Store small appliances on the counter only if they add to the scene, so the buyer sees open, usable workspace.
12. Remove Floor Mats, Runners, and Pet Items
Pet beds, food bowls, and floor mats tend to shrink the visual scale of a room in interior pictures. Removing them helps each space look cleaner and more open. Likewise, this makes it easier for buyers to focus on the home rather than the current occupants.
- Pick up beds, bowls, and toys and store them in a closed room before the shoot begins.
- Roll up floor mats and runners so interior photos show the full expanse of the flooring underneath.
- Check under furniture for pet items or bowls that might creep into the edge of a wide-angle shot.
Exterior Preparation Checklist for a Real Estate Photo Shoot
The exterior of a home sets the stage for every real estate photo, shaping how potential buyers perceive the property before they ever step inside. A well-prepared exterior tells a compelling visual story, turning a simple listing photo into an invitation that draws buyers in.
1. Maintain the Landscape and Lawn
Fresh, well-kept landscaping signals to buyers that a home has been cared for, making it one of the most impactful steps before listing photos are taken. Overgrown grass and bare soil can visually shrink a house, yet these simple fixes can make the space feel polished and inviting.
- Mow the lawn and trim bushes for a neat look.
- Add dark mulch to garden beds to make the house’s landscaping stand out in listing images.
- Trim hedges and edge walkways to make the space feel neat, defined, and photo-ready.
2. Sanitize Surfaces and Entrances
A grimy front entrance can undermine even the most attractive home in listing images, so cleaning exterior surfaces is a step that pays off immediately. Dirt, cobwebs, and stains draw the eye away from a property’s best features, reducing the appeal of an interior space that could otherwise shine.
- Clear cobwebs from leaves, light fixtures, and door frames before the shoot.
- Power wash the porch, steps, and siding to make your home shine in every shot.
- Scrub the front door and surrounding trim to keep the space looking sharp in listing images.
3. Clear the Driveway and Street
A cluttered driveway or street draws attention away from a home’s visual appeal, making it harder for listing photos to showcase the property at its best. Removing items allows good lighting to reach the front yard fully and gives photographers a clean, unobstructed frame.
- Remove cars from the driveway and front of the home.
- Move trailers, camping gear, and sports equipment away from the yard before shooting.
- Ask neighbors to temporarily move street-parked cars to protect curb appeal in property photographs.
4. Hide Garbage Cans, Lawn Equipment, and Utility Lines
Visible trash cans and scattered tools are among the fastest ways to clutter listing images, making a home feel cramped rather than spacious. Tucking these items away creates more space in the frame. This lets the property’s architecture and landscaping take center stage.
- Store trash bins in the garage or behind a fence before listing photos are taken.
- Coil garden hoses neatly and place them out of the camera’s line of sight.
- Remove lawn or gardening equipment from view to create more space in each exterior shot.
5. Style the Outdoor Living Areas
A thoughtfully arranged patio or deck helps buyers visualize how they would actually use the outdoor space, making listing photos far more persuasive. Clutter and protective covers suppress those feelings of excitement that great staging is designed to generate.
- Remove protective covers from outdoor furniture and wipe surfaces clean before the shoot.
- Arrange patio furniture and open the patio umbrella to create a welcoming, livable scene in listing images.
- Add simple accessories, such as a tray or outdoor cushions, so buyers can visualize relaxing in the space.
6. Minimize Visual Distractions
Competing visual elements fragment a buyer’s attention, preventing listing photographs from presenting a clean, focused view of the house. Stripping back these distractions lets the home’s architecture and landscaping carry the image without interference.
- Pull yard signs, political banners, and seasonal decor from the property before shooting.
- Stow away children’s toys and sports gear that break the visual flow of listing images.
- Clean windows and doors for a polished first impression.
7. Synchronize Exterior Lighting
Shooting exterior listing photos in daylight, when exterior light is at its peak, makes a property look brighter and more spacious than artificial alternatives. Coordinating your photographer’s schedule with the sun’s position avoids the flat, blue-tinted results that can result from off-peak hours.
- Schedule the photo session when daylight hits the front of the property most directly.
- Replace burned-out bulbs in exterior fixtures to make the space feel warm and welcoming in listing images.
- Avoid scheduling during overcast midday hours when natural light loses its warmth and depth.
8. Skim the Pool and Water Features
A pool adds roughly 5% to 8% to a home’s value. A crystal clear pool can be one of the most striking selling points in listing photos, depending on the climate, neighborhood, and maintenance. Taking time to clean water features makes a significant difference in how the space photographs and how buyers respond to it.
- Skim floating debris from the pool surface the morning of the shoot.
- Brush the pool walls and balance the chemicals so the water appears crystal clear in photographs.
- Clean fountains and water features to make every element of the outdoor space photograph beautifully.
Things to Consider When Preparing Homes for Real Estate Listing Photos
Proper planning creates a welcoming atmosphere that resonates with potential buyers during their home search. Whether you’re a homeowner, developer, or real estate agent, these steps help present the home in its best light to secure a successful sale.
- Move the shoot if rain occurs, as real estate photographers need dry conditions for high-quality exterior shots.
- Keep pet items and litter boxes out of sight to maintain a clean and fresh environment for photographs.
- Remove personal photos and share entry details to help the photographer finish the shoot and lock up securely.
Final Reminders in Preparing Homes for Real Estate Photos
By following these simple steps, sellers in Houston, Austin, and San Antonio can make their home picture-perfect for its big debut. TK Images is here to capture your property at its best and help you make a lasting impression on potential buyers.
- Declutter high-traffic areas to help potential buyers visualize themselves living within the property during their search.
- Clear surfaces to create clean interior and exterior photos that attract serious interest.
- Our professional listing photographers recommend removing personal items to help you sell the home for a higher price.
- Mow the lawn and trim hedges to improve curb appeal before capturing the final listing photos.
- Clean every window to let in light, which is a staple of high-quality real estate photography.
- Hide pet bowls and toys so the focus remains on the home’s best features for potential buyers.
- Organize items in areas like stockrooms, laundry rooms, and attics.
Benefits of Professional Home Listing Photos
When you are getting your home ready to sell, the images that appear in your listing can make or break a buyer’s decision before they ever step through the door. Knowing what professional real estate photos do for your sale helps you approach your photography checklist with purpose and confidence.
1. First Impressions That Stop the Scroll
In today’s market, potential buyers form an opinion about a home within seconds of seeing the first photo. Real estate photographers capture your living spaces with intention, from the warmth of natural light to the careful removal of family photos. Professional MLS photos create an impression that pulls people in rather than pushing them past.
2. Curb Appeal That Earns a Second Look
A home’s exterior is the opening line of its story, and strong curb appeal in listing photos signals to potential buyers that the care inside matches the care outside. Professional real estate photographers know exactly how to frame a front facade. They draw attention to architectural details and avoid the flat, washed-out look that artificial lighting can produce when the wrong approach is used.
3. Real Estate Photography That Justifies Your Price
Professionally photographed homes command a 47% higher asking price per square foot, (different hyperlink) which means your investment in a professional photo session is one of the most financially sound decisions you can make before going to market. A skilled real estate agent will tell you that high-quality real estate photos don’t just attract more clicks. These quality visuals attract the right buyers, the ones who already see the value before they schedule a showing.
DIY Staging vs Virtual Staging
When preparing your home for real estate photos, the way you present your spaces can shape a potential buyer’s first impression before they ever step through the door. Deciding whether to invest in physical or virtual home staging depends on your timeline, budget, and the amount of work the space needs.
| Factor | DIY / Physical Staging | Virtual Staging |
| Cost | Higher (bulky furniture, decor, movers) | Lower flat fee per image |
| Time | Days to weeks | 24 to 48 hours |
| Best for | Occupied homes with items to work around | Vacant properties |
| Control | Dependent on natural light, space | Consistent, no artificial lighting issues |
| Flexibility | Limited by existing pieces | Unlimited style options |
About 86% of potential buyers find it easier to visualize a staged home. Across Austin, Houston, and San Antonio, home staging remains one of the most effective staging tips to help your home sell. Our professional photographers at TK Images make it effortless. Reach out today to get the best real estate photographer for your home.

Related Questions
What Is the 3-3-3 Rule in Real Estate?
The 3-3-3 rule offers financial peace of mind by keeping three months of emergency cash and another three months of mortgage payments tucked away in savings. Before you commit to an offer, compare three different properties to confirm you are making a wise investment.
What Is the 80/20 Rule in Photography?
The 80/20 rule suggests that 80% of the impact in your listing photos comes from 20% of your focus, specifically on lighting and composition. By prioritizing these vital elements, professional photographers produce high-quality real estate media without getting bogged down in minor technicalities.
What Decreases Property Value the Most?
Major structural damage and overwhelming clutter can scare off potential buyers faster than anything else. A yard full of dead plants or a lack of neighborhood charm further diminishes your home’s appeal and market price.
How to Stage a House for Real Estate Pictures?
Creating a lasting impression involves emphasizing good lighting and removing personal items so potential buyers can envision their own lives in the house. Don’t forget the front yard, as it’s the very first thing people see in your real estate photos.
How to Take Good Listing Photos?
To make your home shine in real estate listing photos, shoot during the day to take advantage of good lighting. High-quality real estate listing pictures require a steady hand and an eye for angles that make every room feel open and inviting.
How to Prepare for Real Estate Photos?
Working with professional photographers is easiest when you remove clutter to highlight your home’s features. Opening every blind to let in light helps your real estate photos look warm and spacious. A tidy environment allows every room to glow during the shoot, inviting families to imagine their future inside your doors.
What If My Home Isn’t Fully Ready When the Photographer Arrives?
If things feel rushed, it’s often better to reschedule so your listing images look their best. For minor gaps in decor, virtual staging can help fill in the blanks after the shoot is finished.
How Long Does a Real Estate Photo Session Typically Take?
Most sessions for real estate listing photos last around 60 minutes, providing plenty of time for professional photography. If your property requires more attention, the appointment can be adjusted to fit your specific schedule.
Do I Need to Be Home During the Photography Session?
It’s helpful to be present before the session begins to confirm that every room is staged and ready for the camera. Once the shoot starts, your preparation allows professional photographers to work efficiently through the home.
Conclusion
Our professional photographers create a stunning first impression that pulls potential buyers toward your property immediately. Let us capture your real estate photos in San Antonio, Houston, and Austin today. TK Images is ready to help showcase your home with stunning, high-quality visuals.